Open raw files from any phone on DxO Photolab
TLDR; It it possible to use DxO Photolab to edit raw files produced by ANY camera that is not on their supported list, even from mobile phones such as Samsung and Xiaomi. It involves using two free tools, and the terminal/command line. Skip to the workaround for instructions.
Even though I shoot raw exclusively on my Canon cameras, I’m completely fine shooting jpegs when the camera’s internal processor is good enough for that. My Fuji XE4 does an amazing job at film simulations, and I have trusted it quite a few times to do the editing for me while freeing my time for more shooting. 📷 I am used to shooting film and getting my settings right on camera, and I’ve never felt the need to radically edit a jpeg I got back from the lab. Most of my film edits are very basic, if any (exposure, contrast, crop). I do the same with jpegs from the Fuji or from my phone.
However, since I switched from Lightroom to DxO Photolab 9, I’ve been shooting everything on raw. DxO’s raw processing engine is on another level, there’s simply no comparison. The files from the Fuji have so much detail and latitude, and even files from my ancient Canon 5D Classic look wonderful (to be fair, it’s still a great camera).
It does an incredible job with terrible cameras too. For example, take my two Canon 5D Mark 3. While the hardware is good, the colors always had me screaming in rage. Getting colors to match between both cameras was hard enough, getting them to match between them, a drone, film shots and video cameras, was impossible. Whenever I shot alongside another photographer who shot Nikon, I wanted to die! I don’t know how else to explain, other than the 5D3 raw files had a sort of “muddy” color to them. But the worst offender was an old GoPro Hero we had back in 2013 or so. We took it on so many adventures, France, Italy, Brazil… but the files looked absolutely horrifying and no amount of white balance, curves, camera calibration, nothing on LR could ever save those files. So shitty they were, I just moved them out of the catalog and into another folder, forever hidden in the depths of my NAS. Well, I don’t know what kind of witchcraft is behind DxO, but it is magical. With just a few clicks on DxO I got a really nice result. I had a blast editing those GoPro shots from 12 years ago, so many moments I had forgotten already, and the images look all nice and normal! 😍
Naturally, now that I have a Xiaomi 15 Ultra in my arsenal, I wanted to see what DxO can do with its raw files. And the answer is: nothing. DxO won’t open dng files from any camera that is not on their supported list.
Their excuse is that raw files from mobiles are not true raw files and it wouldn’t be possible to get the full “photolab experience” with the modules and such, so it’s all or nothing. And we get nothing. It’s literally impossible to OPEN a phone’s dng file and do a basic crop or exposure adjustment. Just let us have something like a jpeg edit, already! Speaking on that, they also won’t allow tweaking the white balance tint (green/magenta) on jpegs, only temperature (yellow/blue) because, according to them, jpegs already have white balance set in camera. Yeah, yeah, yadda, yadda, what a load of bullshit. 💩
So now I am forced to shoot jpeg. And I’m kind of fine with it. I know how to make the camera work for me… With Pro mode I can get it where I want, and by playing around with the Leica film simulations I could get something very nice and fully edited out of the camera. BUT. I was not happy. I don’t need to shoot raw on my phone, I probably never will, but what if I want?!
The raw does contain way more data than a jpeg, and I want to process that data. So I got to work.
Workaround
I am happy to report that, YES, you can edit raw files from ANY phone or camera that is not on their supported list and the process is very simple, but involves the command line – if you are not a tech-savvy person, forget about it. Go shoot jpeg, make sure you get it as you want in camera, and be happy.
For the rest of us, we are going to install exiftool by Phil Harvey and Adobe digital negative converter. Both are free. I’m using the macos versions on this tutorial. And don’t overwrite your originals. Always work on copies.
Step 1: ExifTool
Download the files from your camera into your computer and place all raw files in a folder on their own. Right-click on the folder name, select Services > New Terminal at Folder, copy & paste the code snippet below inside the terminal window, press Enter, BOOM. Done!
for file in *.dng do
exiftool -m -exif:Make="Apple" -exif:Model="iPhone X" -o FOLDER/%f.%e "$file"
What this does is tell exiftool to edit the metadata for every file on this folder, change the camera model to Apple’s iPhone X and save those new copies to a different folder. Replace FOLDER with a name that makes sense to you. If you want, you can also add a suffix so the new files have unique names, by replacing %f.%e with %f_SUFFIX.%e (choose a suffix that makes sense). In case it’s not clear, %f stands for filename and %e for extension, so don’t forget the little dot in between.
Note: This will work with any phone camera on DxO’s supported list. I have tested with “iPhone 8”, “iPhone 8 Plus”, and “iPhone X” but there are other iPhones and some Samsung models there too. Just make sure you pick a model that you have never owned or shot with, in case you want to use a DAM to sort photos by camera at some point.
Step 2: DNG Converter
Now we’ll use Adobe’s converter to rewrap the files and get DxO to read them.
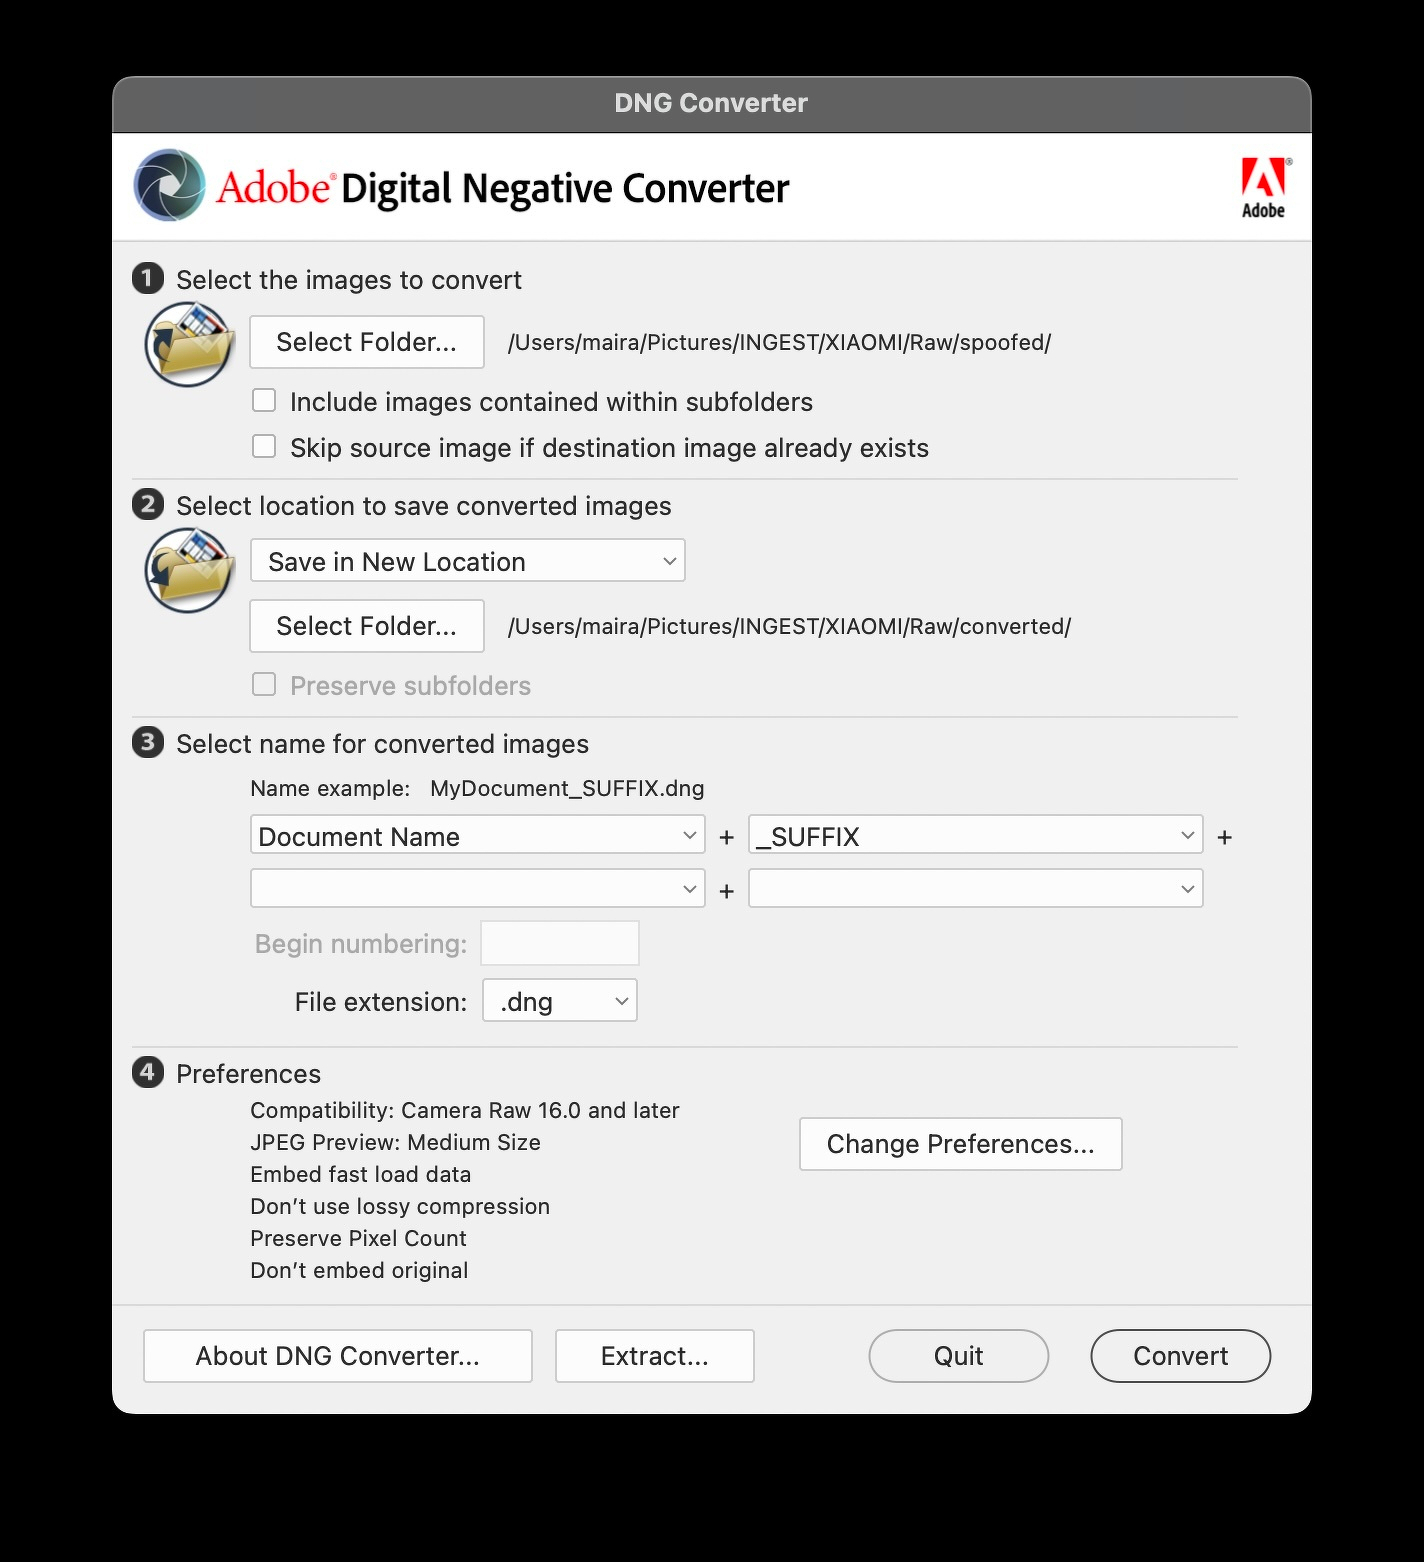
Select the folder with the spoofed files (the ones we just created with exiftool), then save them to a different folder, and optionally give them unique filenames by adding a suffix. The rest of the settings should look like in the screenshot – the latest CameraRaw, no lossy compression (!important), etc. Click Convert and VOILÀ.
Step 3: DxO
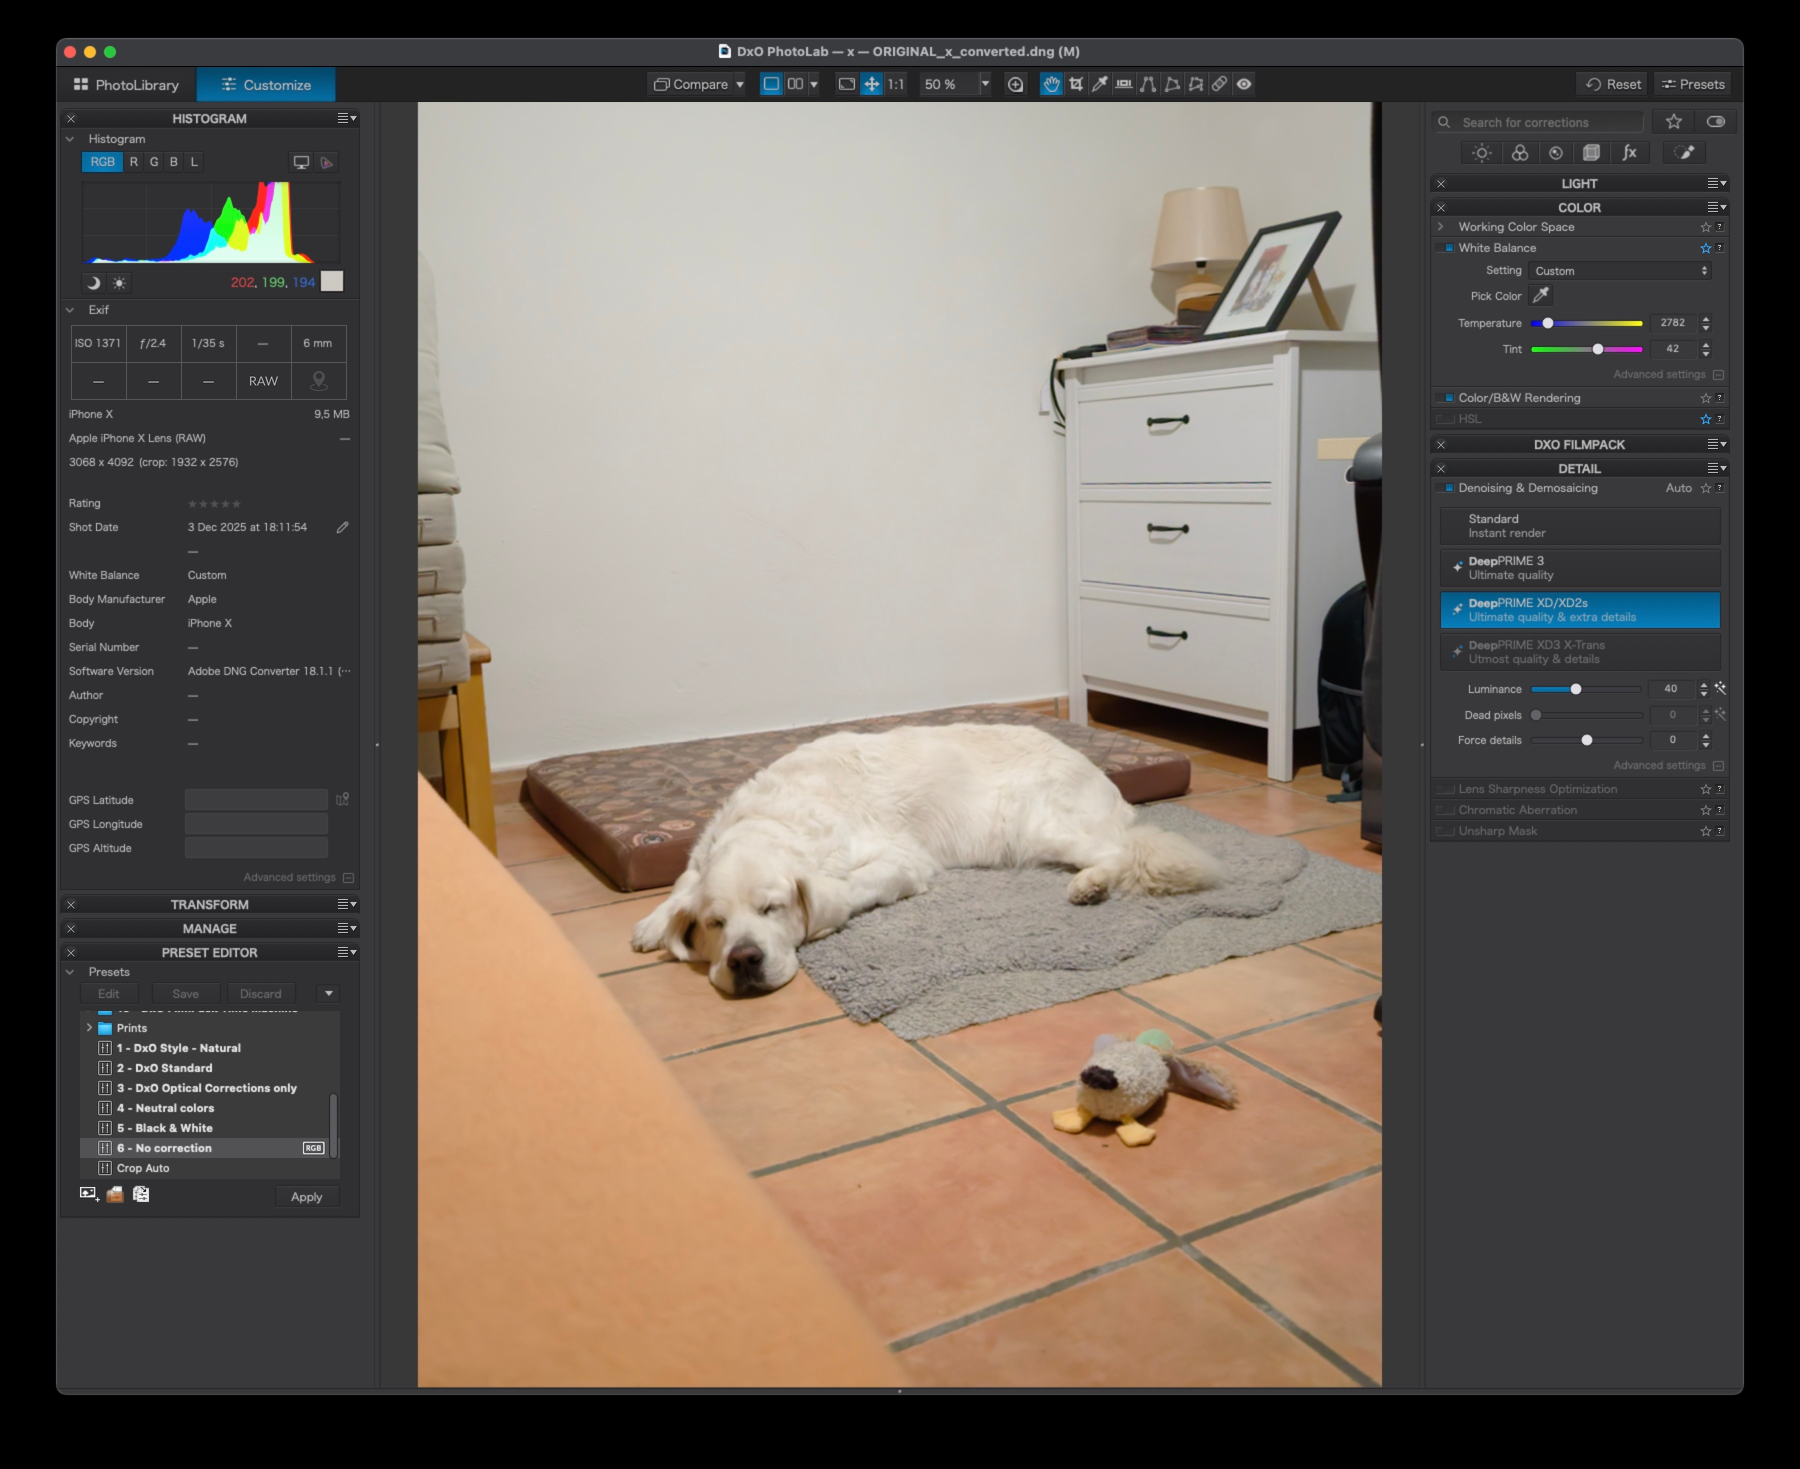
Open your converted folder on DxO Photolab. MAGIC! FIREWORKS! IT SIMPLY WORKS! 🎉
Of course, we don’t get access to the amazing DxO camera/lens models, but we can OPEN our files and EDIT them. We can tweak white balance, apply noise correction (both DeepPrime 3 and DeepPrime XD2), apply Filmpack presets, crop, export…
Note: Depending on your settings, DxO might apply color corrections and lens distortions (specific to the iPhone X, in our example) by default to your raw file. Make sure you apply the Preset 6 - No correction to all your images (either from the Presets button at the top right, or from the Preset Editor menu when in Customize).
Happy Holidays and Happy Editing!